Monday, October 24, 2016

Sugar pine needle tea

With the cold wet weather comes warm fires and flu season. Either I get a little bit sick for a long time or extremely sick for a short time so this time I could feel myself getting sick and wanted a boost of Vitamin C. Sugar pine needles right off the tree are chocked full of Vitamin C and since I can boil water fairly quickly over my wood stove, sugar pine needle tea is the perfect cold weather immune booster.

https://encrypted-tbn0.gstatic.com/images?q=tbn:ANd9GcTCHc1f30wAOzvtIiytR8BdpDOggIJG5basD-NsYqu1EAHRw3nN
This time of year fortunately it is easy to identify sugar pines from all other trees because their pine cones are just about ready to fall or have fallen. Sugar pine trees have large but long cones. The other identifier is their short needles.  Ponderosa pine needles are poisonous to eat so don't be willy nilly trying this with all types of pine needles. I've been told sugar pine sap is pretty good too but I licked some on a tree to try and I was not impressed.

When I take the dogs for a walk, I can make the trek uphill just a little farther than usual to get to the sugar pine trees. Sometimes I get lucky with a low hanging branch since the pine needles need to be green to get all the good nutrients from them. Usually I can jump just a bit and pull some down.

Now, remove the little balls where the needles attach to the tree, you want just the needles only. I have been leaving a pot of water on the wood stove to humidify the room every time we have a fire so I just add some more water and the sugar pine needles. When the water gets hot enough for the pine needles to float to the surface, that is when the tea is ready. I add a packet of black tea and some sugar too because the taste is a little astringent without it and with is quite delicious. I like to strain the pine needles out too into my extra large mug.

I left some pine needles on a small branch in a vase as decoration and it lasted a long while and I just picked some needles off as needed. I used them in about a week but they were still green.

Wednesday, October 12, 2016

Starting seeds

I am super excited for spring plants already. Of course it is fall but I did not live up here the spring of last year. It is hard to find plants that don't need full sun and can resist a spring frost.  I saw a lot of giant hollyhocks, roses, snapdragons, periwinkle and petunias. Even some marigolds in town where it is sunny. Of course bulb plants and wildflowers grow great here.

I also found out hops grows great up here and all kinds of berries.I have a huge patch of blackberries, but a neighbor up the street has olallieberries, and the Ace in town had raspberries and boysenberries for sale.

But as a beginner in a seed starting I got myself some re-seeding perennials. These were hollyhocks and poppies. I also got some hop seeds but they are not doing anything yet. I have been told many ways to start seeds. Some in the refrigerator, some in potting soil, some in peat moss, some in potatoes.

This worked for me and is what I'm doing from now on. So, find a low container that will fit the seeds and does not absorb moisture. I found this plastic drywall mud holder to do the job perfectly.

Now line it with paper towels. I put a couple small pieces of paper towel so each seed variety can be lifted  completely out easily. Put the some seeds on it. Try to spread the seeds apart from each other. Now find a clean spray bottle and fill it with water.

Spray some water over the seeds, not much,  but enough to get the paper towel damp. Cover your container with saran wrap or a shower cap and leave it in an area that gets some sun. Uncover and spray with water every morning and night then re-cover.

When the seeds start to germinate, pluck them out and put them on some potting soil. Or it's through the paper towel already, just take the whole paper towel with it and put it on some potting soil in a pot or peat pot. I love peat pots since I can just plant the whole thing without transplant shock. 80% of my flower seeds germinated this way.

 Have your pot covered in saran wrap or a shower cap and continue the same process. When it is rooted good, you can remove the saran wrap and continue watering,  three times a day since it dries out faster. Mine are currently in this stage. Or if it is planting time, plant it of course. I will be wrapping my peat pots in chicken wire when it comes time to plant since there is a huge gopher population here.

Wednesday, September 28, 2016

Glass bottle lights part two: wiring.

This lamp is for my craft shed, but when I finished this project I was excited to make more and better ones. I found Vintage Wire and Supply which is like a little candy store for doing these bottle and jar lights.However, for this project I went to Home Depot and got some simple candelabra sockets (normal size bulbs don't fit in these bottles), some threaded nipples and hex nuts as well as a candelabra set foe the plug and switch since this one is going to be a lamp. Although I can still easier turn it into a fixture in the future. I had some lamp cord already, I used probably only two feet for these three IBC root beer glass bottle lights.

For tools, all you need is a wire cutter, wire stripper, and a drill with a bit the size of the threaded nipple. You will also need two wire nuts and a little bit of paint of your choosing.

First I put the lamp cord through the threaded nipple, then split and stripped the two ends. On mine, the ribbed goes to the silver screw on the socket and the one with the writing goes to the gold. Most lamp cords the writing strand is the hot which goes to the gold. First I threaded the nipple into the candelabra socket.  Now, you can skip the threaded nipple all together and just do wire with an underwriters knot and a strain relief at the top instead of a hex nut. I didn't want mine swinging around though.

I made a U shape with the stripped wire end and stuck it around the screw and tightened it. Once I saw what my wire length needed to be to reach the middle of my wood base with some room to spare, I cut it. Now the cut end can go through the bottle. The candelabra socket is the right size that the root beer bottles sit on it just right. I though the cardboard socket cover was horrible so I just put some brown Rustoleum on it before installing it back on.

I drilled holes the size of my threaded nipples in my finished reclaimed wood board I am using for the top of my light where the bottles will be. Mine was snug which was perfect. The hex nut goes on top here. Do this for all of them. Now separate and strip all the wire ends on top. You will need one more length of wire as well that will either be to attach to the one coming out of the ceiling for a fixture or like mine, to a switch and plug.

Since I have three glass bottle lights, I have four wires. Once separated and stripped, the hot (writing side) all go together with a wire nut. Then the other side (ribbed side on mine) all go together in another wiring nut.

Now if I was thinking, I would have turned my wood board into an open wood box because I can't flush mount mine. That is okay on mine since it will be high enough no one will see the top of it, but next time or if I do turn mine into a fixture, I will make sides for it of 1x1 inch strips of wood to hide the wires coming out of the top of it but still be able to mount it easily.


Monday, September 26, 2016

Wood signs

I didn't take a lot of pictures for this project because there is not much to it. You do need a router and a bit to do this. It could be a core box bit, v groove bit or straight bit. The core box and v groove gives it an extra dimension. Now I did one sign with a ruler and pencil measuring the top bottom and middle of the letters and giving each letter the same amount of space. The other sign I did freehand,  You can tell which is which.

All the wood used was just what other people had considered firewood. 

Routers are designed with the hole for viewing although you may need to bend down to see good. Wear safety glasses, you don't need flying bits in your eye. Just set the bit at a shallow depth and follow the lines. You can move the router pretty slowly to be accurate. I try to keep a moderate speed so I don't get wobbly. Just pick the router straight up each time and put it down slowly to cut away to the proper depth before moving again.

I sanded the signs and just used plain black acrylic paint with a paint brush. If you do get some outside your grooves, it washes off with water when wet. After that dries, just put some exterior clear polyurethane on it and figure out it you need mounting holes, string holes or a stake depending on where you want to display it. I made some stake ones to mark my trail through the berry patch and one hanging from twine as a gift to my sister for her new last name.

Tuesday, September 20, 2016

Halloween tombstone stakes

This is my first Halloween where I have a huge yard I can decorate. My decorations need to be out in the rain, who knows even snow, so not all decorations will work here in  the mountains. I don't want any fabric or even those fake cobwebs will probably be full of real cobwebs and definitely pine needles when Halloween is over.

I do have a lot of OSB plywood end pieces leftover from my shed roof so I decided to make some tombstones.

First I used the skill saw to cut a my plywood into tombstone sized pieces. Then I used the jigsaw to round the corners off. One of them I left square and did a crack design instead.

Next I put some brown latex paint on both sides. Did the backside first and then the front. Of course if you have gray or black that would work fine too.

Once the back side dried I screwed some wood stakes on, two screws each so I can pound them in if I need to. Once the front side dried I got some lighter spray paint and fogged it on the middle area.

Now is the fun part. I just did hand lettering on mine but it is not the greatest. I made up for my lack of straight letters by making up kooky names, descriptions and unreasonable birth and death dates. It was plain so I added crosses, floral patterns and skulls at the top to dress them up more since grave markers used to be extremely ornate.

I still did not think they were spooky enough so I threw some red acrylic paint on and couldn't get that blood stain look with a brush so just got my fingers in there and made some bloody finger prints and smears. Hey, I know it's not as realistic as I wanted but you can get a letter stencil at your local craft store and use that to make it much better.

I think an outline around the edge would give it more dimension too, but that might be for next year since I got so excited I stuck them in the ground already.

Thursday, September 8, 2016

Glass bottle lights: Part one, breaking glass

This is part one because this is how to get the bottoms off of glass bottles to even start. I've seen so many awesome mason jar lights that I wanted to try my hand at it. You know from my earlier posts that I made a DIY  modern light fixture from an old kerosone fixture. This is similar but the multiple hanging lights gives some extra steps. Plus, you have to take the bottoms of the glass off or it will overheat with normal use.

After watching Youtube videos I thought it would be easy to take the glass bottoms off of bottles. Well it is, but it took me several failed attempts. First off, Corona bottles did not work for me, they don't break at the right point. I am using some IBC cream soda bottles in the pictures and 3 out of 4 came out great. Brown beer bottles work good too.

Second off, I bought a little pen type glass cutter off Ebay for about five dollars and made a jig by using two pieces of closet rod attached to a chunk of 2x4 to hold the glass bottles and be able to spin the bottle completely around in place. I hold the glass cutter to the bottle about a half inch up from the bottom (right above the dent on the IBC bottles) and spin the bottle around with my other hand to score it. This helps keep the glass from cracking farther up the bottle.

Now, I tied twine around my score line. About two or three times around is perfect. Tie it off and cut the extra. Now either pour on, or dunk the twine in lighter fluid. I have been keeping the twine on the bottle now, but my first times I wore gloves and dunked the twine and then put it back on.

Have a bucket of water handy filled up enough to be able to dunk your bottles half way in. Also have matches or a lighter ready.

Light the twine on fire, keeping the bottom up and slowly rotate the bottle around. When the bottom gets black, dunk it in the water. One time the bottom did pop off before I got it in the water, but usually as soon as the twine hits the water the bottom pops right off beautifully.

Like I said though, I had some failed attempts at first but once I got my first one I have been getting most of them off cleanly since.
This isn't it though. You now have a bottomless bottle but it is sharp. I used my orbital sander with some 150 grit on it and sanded away. It actually worked great which I was a little surprised by. It had a foggy look though so I followed up with some 400 grit wet and that made it look much better.


Wednesday, September 7, 2016

Easy necklace display stand

I've sold my jewelry at art walks and had a cool branch with screws in it that I set on my table and have the necklaces dangle off. I wanted  more professional, less back-breaking way for customers to view my necklaces. Instead of spending money on a bunch of velvet busts or glass cases, I wanted something more me, more rustic modern.

I took a scrap piece of 1/4 inch plywood I kept in case I got inspired to paint on it and then some scrap pieces of wood in my cut pile.  I screwed through the plywood a small chunk of a 2x4 at the angle I wanted my plywood. Then I added this little scrap 2x2 piece as a support so handsy people won't knock over the whole display.

Now I have a mess of outdoor upholstery fabric I fell in love with and had upholstered a rocking chair with, but I think burlap would be super cute too. Or if you want to class it up, velvet or satin would be great too.
I stapled the fabric from the back and hammered the staples after so they wouldn't stick out.

I took two of my screws out of my branch and replaced them with 3 inch screws with the same head. These go all the way through the branch and attach to the plywood. And that is it, really! I arranged my necklaces nicely so next time am out selling I can just grab the whole thing.

I have some of these up on my Zibbet page to sell but the others I don't so my customers get even more variety and a better deal in person.

I probably should make one more too so I can bring a lot of inventory.


Friday, August 19, 2016

Selling on online craft stores

Since the start of my blog Rustic Modern Woman, I have been posting projects I've made for myself. Of course, the rock jewelry I sold at the Huntington Beach art walk last year. I loved making my cutting boards so much I made more that I know someone would want to buy for their own home.

Since one of my childhood friends has had success with Etsy, I thought I'd look into creating an online store. A quick search of "reclaimed wood cutting board" and there are a lot of results, of various prices and the first page is even personalized cutting boards. How am I supposed to compete with that? I made an online store, but I am not enthusiastic about getting any hits.

I found another site, Artyah and set up an online store there. It is $5 to start a store, and that's it. Etsy is 20 cents per listing which can add up since they encourage more listings to get higher on their search.  One of the important things about online selling is beautiful photographs. Pictures of your product in action but uncluttered and clean with nice lighting, is the key to getting people to look at it.

Now, another important thing I've learned is shipping. I didn't know then, but if I keep my cutting boards on the smaller side they can fit in a slightly cheaper shipping box. A postal scale is very handy too for exact costs. I know free shipping is in, but I have to raise prices if I have to eat the shipping cost. I might try it to see how it works, but right now I am charging for shipping, but making returns easy. The bad thing about Artyah though is it doesn't change shipping cost based on the buyer's location so I had to set the price at a USPS flat rate box cost which might be higher than it actually is to ship it.

I am under the name Peterson Studios because a last name and what the business does, does not require a DBA so I don't have to go through all that again for San Bernardino County.

Monday, August 15, 2016

Rock magnets

I got a super cute birthday card from my sister and immediately wanted it on my refrigerator. However, most of my magnets are thin or weak. Well, I had to use the magnet hanging up my other card for it so.....To the craft store!

The local craft store here is the Oak Trunk. I found magnets, a set of 8 for 1.99. Now if you have been reading my blog, you know I love collecting rocks.

I found some of my small ones that I kept but I don't think are jewelry quality. I put some semi-gloss sealer on them a long time ago. All I had to do was super glue the magnets onto the rocks and that's it. It took about a minute for the Gorilla super glue to dry.

I just made eight rock magnets for $1.99 and a few minutes and they are unique local rocks so I think that's awesome.

Saturday, August 13, 2016

Used saw blade clock

With all the cutting boards and construction I've been doing,  I had to replace my saw blades. I didn't realize how expensive they are now and there's no way I'm throwing my old blades into the recycling can.

A long time ago as an impulse buy I got a quartz clock kit while buying some supplies at the hobby store. I figures eventually I would find a nice wood round to use as a clock. I haven't yet but my used table saw blade is just right.

First I clean my used saw blade with some Prep-All to get the gunk off and give it a light sanding. I spray painted both sides with some gloss black Rustoleum. I did my smaller blade from my circular saw in tan and did a faux wood airbrush job on it because I was originally thinking of combining them to do a double saw blade two-tone clock. I liked just the simple design of the black though, the saw blades give it enough flavor.

Once the paint dried, I added the numbers included in the kit. They had a sticky paper backing but it really wasn't sticky enough so I put a drop of super glue on each number to place it. Now the 12, 3, 6, and 9 were easy because the table saw blade had 4 air holes exactly where they need to be. I eyeballed the rest from there.

I put the main clock mechanism through the hole in the middle of the saw. The only thing extra I need is a washer from my hardware bin before putting the nut on. I screw the nut on tight by using some needle nose pliers, and make sure the hanger is aligned with the 12 on the clock.

This particular kit, the hour goes on first, then the minute, then a nut, and then the second hand pushes in.

One double A battery and my clock is ticking. I set to the time and it's been 6 hours and it is still right.

Saturday, July 16, 2016

DIY Compost bin

I have been trying to get up the enthusiasm to make a rolling bin with a trash can but my neighbor gave me this nice rolling plastic bin with  a lid on it like you see used by maids or prisoners for laundry.


Bilbo (my dog) got skunked again last night, the fourth time in two months ,and I have been thinking they are getting drawn by the compost I throw out in the berry patch. Besides, fertilizer can always be needed even if it takes a year.

I took off the wheels since I will use that for something else. And although you can just drill holes in the bottom and put dirt in there, I decided to cut off the whole bottom and sink it in the ground. I used a jigsaw because my boyfriend had the sawzall but actually, the plastic cut really well. I wore my respirator since plastic fumes from the heat of cutting are very bad for you. Although, like I said, it cut with no trouble so I might not have needed it.

I picked an out-of-the-way but sunny location for my compost bin. I dug a hole for it, and the ground here in Crestline is very soft and easy to dig since it is so fertilized by pine needles already.

Compost needs sun, moisture and oxygen to decompose fast. The bottom cut off should let worms and bugs help me out too.

The sunny location and the lid will keep it like a greenhouse, and I've been  told adding a cup of water when you add the already moist compost will keep it humid to decompose faster.

For oxygen, and also so rain will go in, I drilled holes in the lid, I think they are 3/8 of an inch but you could drill more of smaller ones instead.
I back-filled around my bin just  a little so nobody or animal will break an ankle but not enough so the sides come in.


When it gets a good layer of compost, I will use my shovel or pitchfork to stir it around and do that every time it gets a good layer of compost.

The other good thing about cutting off the bottom is I will be able to slide the whole thing up if I need to instead of trying to lift a heavy bin of dirt, but this is low enough I can shovel straight out of it.

Compost doesn't stink unless you are right up in it or don't have any air holes but I still put it away from my house since the gnats love it.

Tuesday, July 5, 2016

Butcher block cutting board

I had some leftover scrap wood from when I made my kitchen countertops. I used the very same technique on the countertops as I did on this butcher block cutting board. The only difference is I used epoxy on top of my counters and vegetable oil on the cutting board. All the wood for my countertops and this cutting board was what other people would consider scrap wood, and small lengths of 2x4s.

I first gathered all my wood that had a width of at least 1 and a half inches. It is nice to use a mix of different colored wood. You can buy butcher block of all one color. The mix makes it look high quality. I have scrap douglas fir 2x4s, redwood 2x4s from my neighbor that had rotten ends, and a few awkward pieces of walnut.

 I used my chop saw to cut the ends straight and the bad wood off. Then I set my table saw at 1 1/2 inches and ripped my 2x4s and every piece wider than this.

Now I arranged the pieces. With nice square wood it is easy but with my scrap wood, some of them did not fit tight against some so I had to keep rearranging the pieces. Also, 2x4s have rounded corners which can be used at the ends but not great in the middle.

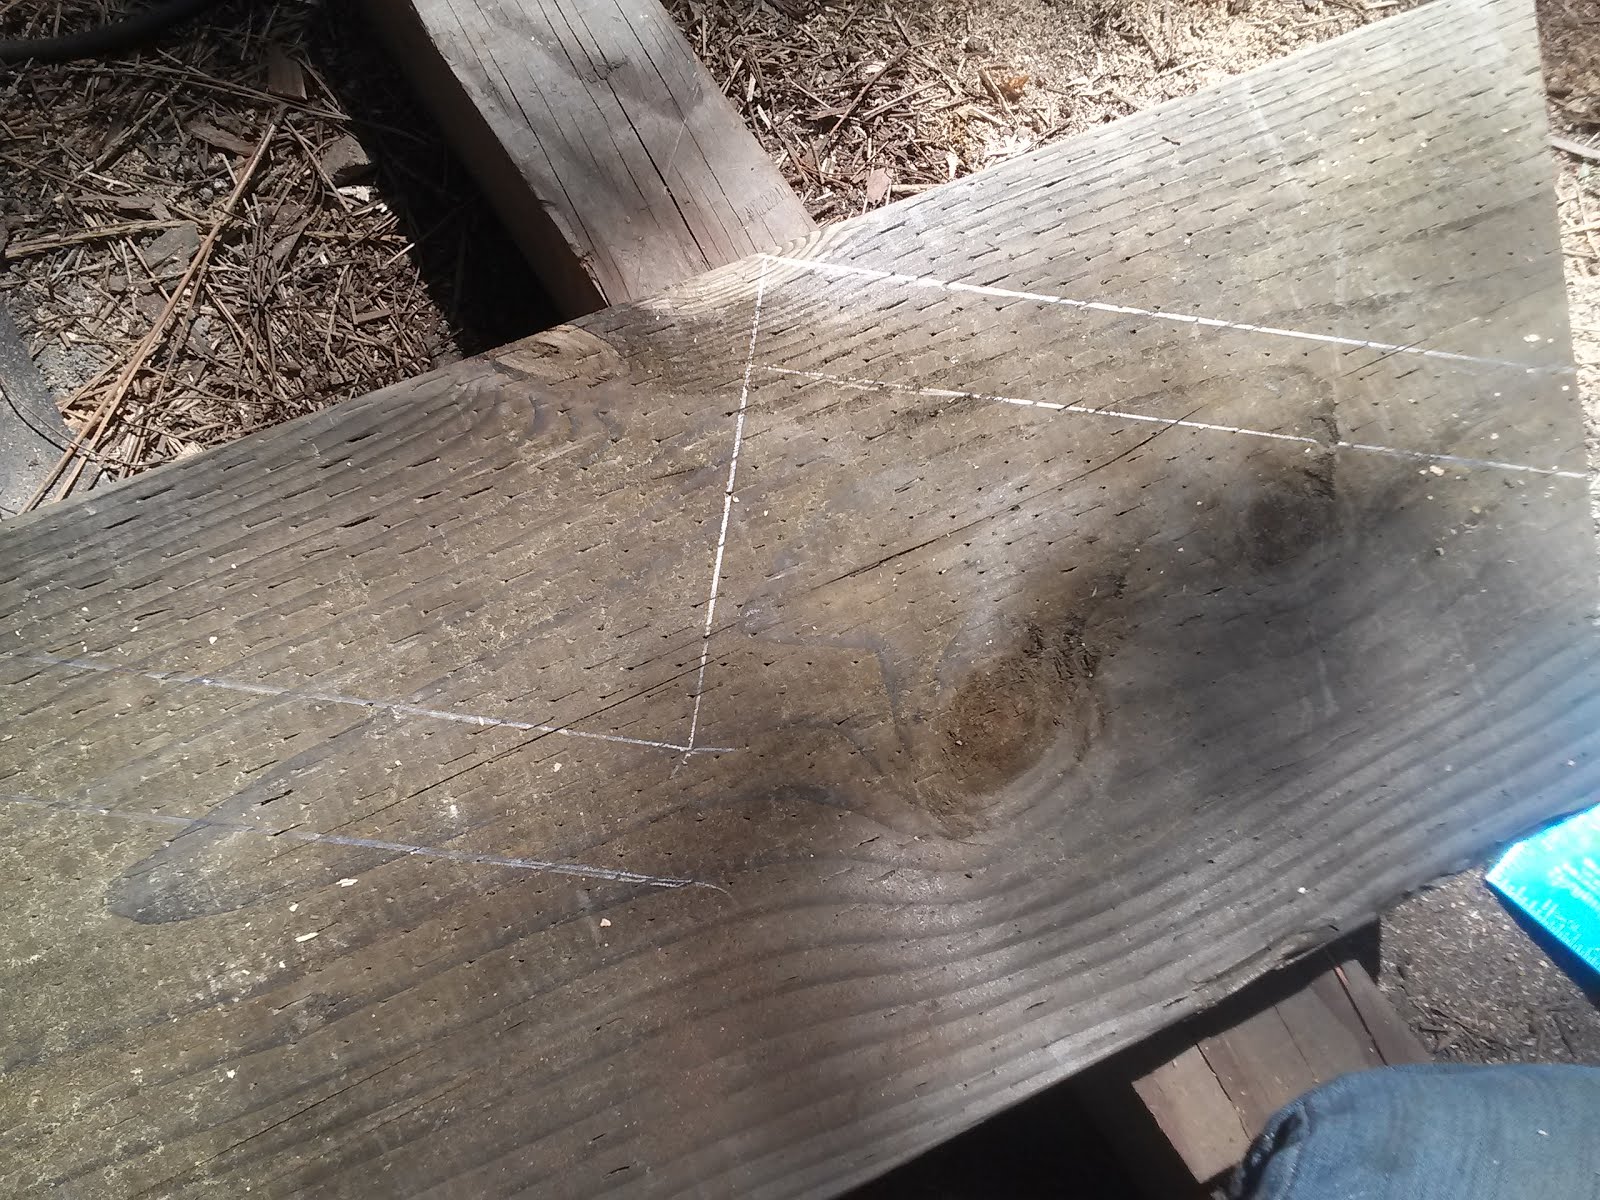
With my pieces in place, I put pencil lines across the breaks. This is where my dowels will go to hold the cutting board together so just one in each piece, some on both sides offset is good enough. My first try at my counter, the glue was not enough so dowels or biscuits are needed.
You can choose to number your pieces here too to make things easier but I just drill one row at a time.

Find something to use as a guide to drill the holes. The holes can't be too close to the top or bottom and need to be the same on both sides for the dowel hole. Pick a drill bit slightly larger than the dowel and drill at least half the dowel width into each piece, on the ends I drill about 60/40 so I don't drill through the ends. I also rotate the drill a little to widen the entrance of the holes to have a little wiggle room when clamping.

Test all the pieces with the dowels for fit as you go.

Now use waterproof wood glue to glue a light layer on all the wood attaching to other pieces and some glue down in the holes. The glue sets up quickly so you better have checked everything for fit first.

Now use two long pieces on the ends to clamp across the whole cutting board. I used one across the width while using my other one to clamp and unclamp every row across the length to tighten the pieces together, then put both of them across the width on each end and used a hammer to get any ones that came out of place back in line.

The next day, I unclamp my piece and use my t-square to mark my cuts to get the cutting board square. I use a skill saw to cut the two ends. Then use an electric hand planer for the two other ends and both the top and bottom. It takes a while doing many shallow passes but I don't have a drum sander.  If the pieces were all the same, it would be easy, but these pieces are very uneven so I have to plane a lot off to get to the lowest piece and be straight all the way across. I router the edges with a round edge bit on both the top and bottom all the way around.

Now, I fill the gaps in my wood with colored sand. Another option is coffee grounds. With a putty knife, I push the sand into the cracks until they are full and sweep my excess back into the jar. I put a snail trail of glue over all the cracks and just use my finger to spread it across the gaps.With a wet rag, wipe down the excess.

After letting that dry, I sand everything with 400 grit sandpaper. Now it is done, and I just rub cooking oil all over it to finish it.


Saturday, June 25, 2016

Wild strawberry jam

I have a patch of wild strawberry in my backyard. I have been anxiously watching the plants grow, get flowers and then tiny green berries. Then I started munching on the first red ones. Then I had enough to put in my cereal. Now it is peak season and I gathered two cups in a day. That is the perfect amount for one jar of jam.

First pick off the tops and any other twigs, etc that got in the strawberries. Now wash them.
Since wild strawberries are so tiny, there is no way to cut them, just throw in a pot while they are wet. Add sugar on top.

Turn the heat to low and let simmer until the strawberries get juicy.

Turn the heat to medium and stir until all the sugar is mixed in. Stir until the mixture in nice and bubbly.

Now stir again and leave alone, uncovered, for fifteen minutes.

Stir it when the time is up, it just be the right consistency now. Let it cool.

Add a little lemon juice to help it keep. Spoon into your jar and put the lid on. Refrigerate.

I didn't add enough extra sugar to account for the lemon juice added so mine came out not as sweet as I like my jam but you could omit the sugar and make straw-lemon jam. My boyfriend is a fan of lemons and straw-lemon jam but I eat more jam than him and I like it sweet.

The consistency of fresh home made jam is what appeals to me, over the store bought Jell-o consistency.

If you love to gather like me then you will love this quick easy recipe.


Tuesday, June 21, 2016

Wire wrapped rock jewelry

Wire wrapped rocks are easy and cheap to make and look like something you could find at a store. I wanted to make rock jewelry without having to solder or make molds and found a tutorial online for these same necklaces. I figured out how to do earrings too.

If you are like me, then when you see a rock that is prettier than the rest, you pick it up and put it in your pocket. I ended up with a lot of rose quartz this way.

I have a rock tumbler now, but when I started doing this I did not but still wanted shiny rocks.I pick out the rocks from my collection that are about a quarter to half dollar size that are pretty enough that I would wear them. For earrings, they need smaller rocks obviously.

I clean my rocks and use a paper towel to carry my rocks outside. With a spray can of clear gloss lacquer and a respirator on, I spray the rocks heavily and gently roll them around in the paper towel. This gives them an even coat without letting the rocks stick to the paper towel. Lacquer dries faster than other clears so you just need to roll them around a minute. Then I put them good side up and leave them for a while to let the lacquer smell air off.

At Michael's there is all sorts of jewelry making stuff. I got a set of little bins with all the jewelry making stuff  I need. It had dangling earring hooks, jump rings in two sizes, crimping beads, and lobster clasps.

Also at Michael's I bought some wire. I used just silver craft wire for the rock necklace shown but it is a little thin so I got some 16 gauge wire for the future ones. They have copper and brown wire too.

Now that you have a rock picked out-some pointy edges makes it easier to wrap, some wire, a jump ring,  needle nose pliers and a wire cutter handy, we can start.

Cut a length of wire about 8 inches long. Put it through a jump ring with two equal lengths on both sides. Now twist your wire a few times to set it.

Wrap the wires around the rock. This why you will be glad to have some jagged edges. You can wrap as few or many times as you like. Finish each side by wrapping it around the twist you made at the jump ring. Now twist the ends around and cut off the excess.  Use the needle nose pliers to tuck it the sharp ends.

Now use your needle nose pliers to grab the wire on one spot of each wrap around the rock. You have to tighten the wire.When you have the wire, twist either  up or down. This depends on the jag of the rock. If you pull one way it might slip off, and the other way will make it tight.This tightening will make a lightning pattern in the wire so you can choose to use this in the middle, at the side, or do it on the backside to not be seen. I have done two in each wire but sometimes the second pull will straighten out the first.

I know that last part was a little confusing but once you do it, it will make sense. I think this one is just embroidery floss for the string but most of mine are cord. I would like to try with leather string to get a real rustic look. There are several ways to connect the necklace, I used just adjustable knots so the necklace can fit anyone but you could use a lobster clasp and jump ring, or magnet clasps. It is up to your own preference.

Friday, June 10, 2016

Bas relief wood carving

In my last post I told you how to make a rustic modern bench. Now I will tell you about the bas relief wood carving I did on the top of it. I used to carve little animal totems out of wood with a razor blade when I was bored but this is a little different.

I got a Japanese wood carving set a long time ago and have mostly used it for carving pumpkins but the cedar I got to make the bench top is so soft I knew I had to carve something into it. My favorite animal is a beaver so I start with a pencil drawing of my beaver. When I see it drawn out I decide it needs a little more so I add some simple leaves and a branch for him to gnaw on.

Now with my first wood carving tool, just an angled chisel I dig my lines in. I make them even deeper with my smallest "V" tool. Very quickly I learned to wear gloves because the wood handles were not ergonomic.

Now I use my bigger "U" shaped tool to go with the grain outside the lines. Sometimes you have to angle about straight down to do this but you won't get any chips and it is easier to carve with the grain. I do about to two inches outside the lines.  These are the only three wood carving tools I use for this carving.

I go all around my nose, eye, ear, and the tops of my legs to carve the outside deeper so these features stand out. Sometimes I go back to the angled chisel to dig deeper and then continue with my big "U".

I use my small "V" to scratch in the fur. and put a little texture to the branch and make the veins in the leaves.

I now use a coffee ground stain to darken all my carving marks.If you don't know what this means you should. Wet coffee grounds give a nice walnut-like stain to the wood. I rub it in and then get a brush to really get the grounds into the grooves. Now brush the excess off and let it dry.

Now is the time to sand the wood. Just a little though. The low carved spots will keep the dark stain and the rest with be natural wood color and soft since this is a bench to sit on. I say only a little sanding because you might take off some of the beautiful detail that went into the wood.

It is time to put on your protection. I used log cabin clear gloss. It takes about two days to dry but gives a good gloss and UV protection. Normally I would just use water-based polyurethane since it is so nice to use and gives a sheen between semi and full gloss although it says glossy. I was almost thinking about doing epoxy to make it look super expensive but since it will be outdoors all the time and it freezes here it is not the best for my project.


Thursday, June 9, 2016

Making a bench

My neighbor down the street gave me a chunk of cedar that I immediately thought "Bench". I used my handy dandy 14 inch electric chain saw to cut off the rotten end. Then sanded the bottom and made some quick legs from some old but still good 4x4s I had laying around.

 The only problem with this is that my screws are 4 inch too so I had to drill with my biggest drill bit down about an inch and a half and then use my long bit holder and screw down into the holes.

I cut my angles at 30 degrees at 17 inches to the ground. I forgot to account for the 4x4 on top I needed since the cedar is very wavy so my bench turned out a little high. My toes can touch the ground or swing.

I put the leg assembly together and then eyeballed where I wanted them on the bottom of the bench. I marked both sides with a pencil.

If you have to use more than one piece then you eyeball from the top down; the legs will stand pretty good on their own. If you have just straight planks then screw them down.

I had to use a router with just a straight bit on it to take down the high spots inside the lines I marked for the 4x4s because of the waves. Just move slowly and take off just a little at a time. On one side I had to do half the side and the other just a few spots higher than the rest. I recommend safety goggles and ear protection since routers will spit chips and can whine if you try to take off too much wood.

I test it my leg assembly in my new grooves. I now have to drill holes to attach the leg assembly to the bench. I put in two screws on each side and flip the bench to see if my legs are even. They aren't.

With a free beautiful wavy piece of wood I don't mind cutting a little more. Judging my wobble I had three legs fine and one too long so I used my chainsaw to chop the end. Then I flip it back and attach the rest of the screws.

I sanded the edges and put polyurethane on the bottom and legs of the bench.

The next day I did the top.Next blog post will be about that and you can see the finished bench after I did some bas relief wood carving into it.

Saturday, May 28, 2016

Branch shelf brackets

Last time I made shelves out of live edge wood I bought shelf brackets. At 7.99 a piece it negated my free wood.

This time I decided to make some out of the dead sequoia branches I knocked down a few months ago.

I have used the sequoia branches for cabinet trim, I put a piece in my countertop, and drilled holes in  the biggest straight ones to hold up the shower curtain rod.

Any branches will do if they are at least 1 and a half inches thick. Sequoia wood is prettier in the middle anyway, the outside looks like it could be cedar.

First cut your branches to size. The vertical ones can be pretty short, but I did the width of the shelf which is 8 inches. Now you need to cut the diagonal one. Each end gets a 45 degree. I cut one 45 degree then eyeballed where it would hit the shelf and cut the other 45 degree. I cut all the diagonals to this one.

If I didn't have my shelves made I would put another horizontal piece to make a triangle but really I don't need it. These shelves are holding detergent and towels.

Remove the bark. I know, I know, it  is cool to see the bark but especially with pine there are bark beetles or termites that love bark. I used pine for my actual shelves and the bark came off so nice with a hammer and small chisel that you can see the texture it left. My sequoia branches did not come off so easy except for the wet ones. I used a sharp knife and essentially shaved the pieces. Then I used a sander with 60 grit to get the rest off. I let them dry in the sun a bit.

I pre-drilled all the holes. Two in each vertical and one at the top and one at the bottom of every diagonal at an angle.

Now find your studs to attach the verticals. I used 3 inch screws to secure one side and then put a long level on top of this one to mark where the top of the other side goes. I used one and a half inch screws to screw the bottoms of my diagonals on.

I set my shelves on and adjusted my diagonal branches to make the shelf level. Then I screwed the tops of the diagonals in. Now I screwed down through the shelf into the vertical branches to secure it and screwed more screws down into the diagonals from the top as well. Now put some polyurethane in the gloss of your choice and you are done.

Yes it took a few hours, mostly taking the bark off was a pain with the sequoia branches. However it gives my laundry room the rustic touch and I will probably do it for my next shelves too.


Thursday, May 26, 2016

Outdoor Stairs

Stairs is another thing that seems difficult but is actually easy. I forgot most of my trigonometry but luckily a framing square does the work without math.

You need a circular saw, a framing square, pencil and measuring tape, 3" deck screws and something to screw it with ( I love my impact), a hammer and some 3" framing nails. If you do it with brackets like me then you need stair brackets and hanger nails too.

I got 2 pressure treated 16 foot long 2x12 boards and 10 stair brackets for my stairs. It was a total of 5 stairs. Four for the front door and one for my side door.

The most important part of making stairs is using your framing square properly. The general rule of stairs is 7" down and 11" over. To get your angle hold your framing square with one side at the 7" mark aligned to the edge of the board and the other at the 11" mark aligned to the edge. Mark this angle. For the first cut take the line from the 7" side and take it all the way across the board. This will create the angle that will be attached at the top.

To find out how many stairs you need measure from the where the top of the stairs will be to the top of where the stairs will land. Now mark the top edge of your stair board there. Now you can cut the 11" side you just marked because this will be the top stair.


From the last 11" mark that was cut slide your framing square over so the 7" is now on it and draw this right angle.Keep making angles with the framing square set to 7" and 11" until you get to or past the measurement mark you made for the top length.

You can make it flat on the bottom when installed or plumb up and down both by using the framing square aligned with the last stair mark made. It takes a little visualization to get it right but pencil can be erased.

Now there are two ways to continue. You can either cut out all the triangles made by the framing square and place the treads on top or you can use brackets and place the treads on them instead. Brackets cost about $5 each for heavy duty ones and require access to the underside of the stairs to finish nailing. Cutting out the triangles means less wood supporting each stair.

When cutting the triangles out it is handy to have a jigsaw or sawzall to get that last little piece holding the corners in after cutting both ways with a circular saw. Remember to make the treads that extra 3 inches longer or more if you want overhang to sit and nail or screw them down.

I used brackets since I was hesitant of cutting the angles. Not anymore though. After doing this project I am more confident of making stairs.

On each penciled in stair angle, the top is where the tread will be and the bracket needs to be the width of the wood below that line so I used a scrap piece placed against the line and marked below it.


I put one hanger nail in each bracket at this new line and put a level on top to put in the next nail. Then put in all the nails.


I attached the bottom of my sideboards first since I had a set width already there. The top is not attached so it can be adjusted.

Cut all your treads the same length. Since my sides were attached at the bottom I measured that width and put the first tread on the top to align the sides. I used one deck screw per side to go through the side board into the tread to hold it in place since I have to nail the bottom of the tread into the bracket still and it will jump and move without something holding it. Then I screwed the rest of the treads on through the side boards making sure they are aligned with my pencil lines from the framing square.

Now that they are secure I attached the top of my stairs to my wall. I toenailed 2 framing nails per side through the top of the sideboards to my bottom plate under the door.

Here is where I slid under the stairs with my hanger nails and hammer to attach all the treads to the brackets.


I am going to make a rail on one side but for now they are done.


Tuesday, May 24, 2016

Make a lamp out of anything

A long time ago I made a hanging milk can lamp out of an antique milk can that the bottom rusted out. Just recently I turned an antique kerosene lamp into a modern light fixture.

A lamp is easy. Just get a socket, plug, switch and lamp wire long enough to go from your lamp to a wall outlet. Lamp wire is two strands stuck together. Does not matter what kind for a lamp. My hanging milk can got 10 feet which was a little much. Put your wire through whatever you want to put it through. It might need to go through lamp pipe that threads to the socket depending on what you are doing. Then strip the wire ends. You should have four stripped wires, about half an inch showing bare. Put the socket on one end and the plug on the other. Home Depot's had instructions in the bags for which end goes on what. The switch I got just snapped onto the wire, no cutting or stripping. Put in a bulb and bam! you have a lamp. Don't hang a lamp just by the wire, you can attach a chain and loop it through a plant hanging hook to take the weight off.

For a fixture you just need a socket, and some 16 gauge lamp wire.  Any home improvement store should have it. Get enough to go from the bottom of your fixture plus at least 6 inches above. I used two feet for my hanging kerosene light.  I also used a socket that had a threaded switch hole on the bottom to stay upright in my specific light.

The strand with the words on it is the hot side. This goes to the gold screw on the socket. The other goes to the silver. You will need to split the wires. I used a diagonal cutter to start then pulled with all my might. Now strip about a 3/4 of an inch off the ends. With my socket I had to make U shapes with the exposed wire and wrap it around the screw shafts. Face the U shape so when screwed, the screw will pull the wire tighter.

I put the bottom switch through an existing hole at the bottom and used the provided nut to screw it tight.

Now I had to drill holes for the wire to go through in the base and top. I used a chainsaw (rat tail) file to deburr the holes. That is very important so you don't tear the coating off the wires. I also used zip ties to keep the wire flush against the fixture to hide the wire. Once fished through everything split the wires at the top just like the bottom and strip the ends.

Now kill the power to the circuit you will be working on. My circuit breaker isn't labeled well so it took a few flips and running inside to flip the light switch and back out to get the right one.

I had a "boob" light where the decorative "nipple" unscrews and then the glass drops to reveal the screws holding it to the box. Drop the light and unscrew the wire nuts on the wires to fully remove it. If it is black and white wires then the black is the hot and goes to your hot lamp wire with the writing on it. The green or bare copper wire is the ground.

Use new wire nuts to place the bare end of your lamp wire to the bare end of the wall wire. Just put them together and twist the wire nut until you can see the wires twist around at least twice. Tuck the wires back up into the box.

My fixture also had existing holes in the top piece to screw the fixture into the electrical box so I used the old screws to install it. Now I put the bulb in and turned the circuit back on.

Flipped the switch a few times to make sure it worked so now I have a rustic modern light fixture.

Sunday, May 22, 2016

Chalkboard Paint

Chalkboard paint  has been around for a while but now it is popular. I got some for free at the Hazardous Waste re-use center (At your local household hazardous waste) and it took me a while to figure out what to do with it. It is water based so don't let it freeze; keep your latex paints inside even if you are lacking room.

The pony wall I put a bar top on between my kitchen and living room I thought needed to be darker. Chalkboard paint would be perfect! My entire house has wood paneling halfway up the walls so this pony wall was all wood. I sanded it with 150 grit and then cleaned the dust I just made off it with a wet cloth.

I made a quick chalk holder with some scrap wood and screws and screwed that on the wall.

Then I taped some paper to the floor since I am a bit messy with paint. I used a nylon brush for the cracks between the paneling and then a paint roller over all of it. It took two coats for full coverage.
I let it dry overnight and then slid chalk sideways over all of it and wiped it off to prepare the surface.

Now it is our grocery/to-do list. I just take a picture of it with my phone before shopping instead of using up paper.

If you are excited about this then you should be more excited to know that there is also whiteboard paint, magnetic paint, and glow in the dark paint for you creative people. Eventually I am going to try the glow in dark to remind of the stars I used to have on my ceiling as a kid.

Saturday, May 21, 2016

Banana Bread

First off I changed the name of the blog; someone was already a mountain modern woman long before me so now I am a rustic modern woman.

Next I made banana bread on this drizzly cloudy day. It is the same recipe from my Home Ec class in middle school. My dad still uses the pizza dough recipe I got too.

Banana bread is my kind of recipe. Not too many ingredients and comes out delicious every time.

To make two loaves start with one stick of butter and one cup of sugar in a mixing bowl. Use a knife to "cut" it into a crumbly mixture.  Now add 2 eggs, 3 tablespoons milk and  3 bananas and with the same knife smoosh all the bananas into little chunks.

Add 2 cups of flour and 1 teaspoon baking soda. Mix until there is no more dry flour. Heat the oven to 350 and pour the batter into two oiled loaf pans. The recipe rises about 40% so fill a little over halfway. This is the perfect amount for two beautiful loaves. Now set the timer for 45 min and find something else to do. So far every time I have had perfect loaves and they are so good I have to give some away so other people will think I am an awesome baker.


Friday, May 20, 2016

Tar and Shingles

As promised, here is the continuation of the roof project. When I moved into my new house I scoured the place for all that was left behind. In the crawl space under the house were several rolls of tar paper, stacks of shingles, insulation rolls, even some joint compound.

I found out after starting that each roll of tar paper had about 50 feet on them and it took 3 and a half shingles to make a 10 foot row. In all it took three rolls of tar paper and 3 and a half boxes of shingles for my 8x14 shed with two overhangs.

No power tools needed for this! Just a sharp knife, a measuring tape, pencil, T-square, stapler gun, and a box of staples for the tar paper. Almost the same except instead of staples, a hammer and a mess of 3/4" roofing nails with a needle nose pliers to hold the nails to do the shingles. It took me one day to do tar paper and shingle half the roof and the half the next day to finish the shingles. This is my first roof too.

First, if you don't have it already, a drip ledge is needed all around the roof. I got 4 pieces of 10 foot 2x2 and 2 pieces of 10 foot 2x4 ones that were pre-colored brown since my shingles are brown. They are very light and easy to cut with a hand held tin snips. The wider ones are for the bottoms where the rain will run down and the skinnier ones for the sides. Just put them on your edges, the little flip goes down, mark the edge with a pencil and use tin snips to cut. Then I used roofing nails, about every two feet to attach them. This is how I learned to hold the nails with needle nose pliers to hammer. I have small fingers and was nervous.
Holding 3/4 inch nail with needle nose pliers to nail.

Now for the tar paper. I already knew I had a 10 foot wide roof but was not sure of the length so took my handy measuring tape and measured, also had an overhang on the other side of the roof to measure. I started on the easy square side of the roof.  I measured out two pieces to go vertical on the sides of the roof first. That way I have extra protection in case I cut the horizontal ones too short.  I put my measuring tape on the ground and locked it where my measurement was and rolled out the tar paper to that. Then with my T-square at the measurement I used a sharp knife to score it and then starting sawing with it to get my cut.

Throw the pieces up on the roof and make some of the horizontal ones and throw those pieces up too. Now armed with my apron for easy pockets for my staples and staple gun I throw myself on the roof.  Start with the verticals, then the bottom piece, then align the next pieces to one of the lines on the tar paper. I used one about a foot down. Staple in the wood not the drip ledge and just go all around the edges. You can go a bit over the ridge or leave off right before the ridge. Then repeat on the other side. At the end put one more piece on the middle of the ridge. Done!

For shingles, put stacks every few feet on the roof and fill your pockets with roofing nails. Start at the bottom corner again and just do a pinky finger over the bottom edge and flush at the side. Nail two inches above the overlap line, every six inches and I put an extra one at the edges. Make the row. When you get to the end take a shingle and flip it upside down and score with your knife about two inches more than you need and cut. I tucked the ripped up edge a little under my last shingle to hide it. I had to sharpen my knife three times since tar is so thick and sticky. I save my cut pieces for the start of every other row and overlap a full shingle on top to hide my poor cuts. You need to get good before the ridge pieces at the end unless you have special ridge pieces.

Stop your shingle rows before the ridge and go start at the bottom of the other side. Keep going. When you get to the ridge I had one side right up to it and one a little short so I put one more row and nailed it over the ridge. Then I cut my full shingles into thirds hamburger style and started at one end and overlapped these pieces 50% making like a stack of tipped over poker chips. I nailed four nails across at about 40% of the width so the next piece would hide the nails. At the end you are stuck. There are going to be nails showing and I had some Henry's asphalt patch leftover that I put on the nail heads just to be extra cautious. Done! I swept off the roof, shimmied down and took down my scaffold. Good thing too because it rained last night after a week of beautiful 70 degree weather.

Thursday, May 19, 2016

Cutting plywood, starting a roof

Today I finished roofing a shed on my property that I started building with my dad 2 weeks ago. My dad loves building sheds. The weather has been excellent so I put on some music, rolled onto the roof and finished what I started yesterday.

It was last week that I cut a bunch of plywood to cover the roof. I got some free OSB (chipboard plywood) from my neighbor who works at construction sites. He said it was used to temporarily cover skylights so they all had notches at all four corners. A little more work and not as high quality as roofing plywood but hey, the price is right and it is just a shed.

I measured the usable areas on my plywood and then went up to the rafters with my measuring tape and found the largest middle-of-rafter to edge-of-roof I could make from my pieces, measured the leftover, and then back down to cut them all.

I used a circular saw to cut, a T square to draw my line, and a long 2x4 screwed down as my guide. The saw has a metal guide on it too but it is the width of a 2x4 so I aligned my long 2x4 by using a small 2x4 block against my pencil line and screwed my guide with some hex head screws and an impact gun with a bit holder on it. Impact guns save me soooo much time and they have gotten to  better prices so buy one and a bit set if you don't have one. I have the Milwaukee since I already had some batteries.

This is how I cut all plywood; it is just way easier than having to get the table saw set up and grabbing a buddy to hold an end while you stretch your arms to their full extent. Bleh. Just measure each side, T-square between the marks, 2x4 block at the line, then long 2x4 against that and screwed down. Cut, unscrew board, and on to the next. Good idea to wear safety glasses, ear protection and gloves. My antique circular saw is noisy and all of them spew wood chips.

To put the plywood pieces up on the roof first I screwed (with my 3" hex head screws) some small 2x4 blocks to the rafter ends with just a bit poking up to stop the plywood from sliding down and I put extra blocks on the corners making an "L" to have a hassle free alignment.

Now I had to enlist my boyfriend's help to slide me up the plywood pieces while I stood on the attic. Start with the corner and shove the plywood into the 2x4 "L" and screw that bad boy in. I used a hammer to start some 1 3/4" screws with a Torx (star) head and my impact with a Torx bit to screw them in. Screw on the rafters oh about every foot in the middle and six inches on the ends.  Align the next plywood pieces to that piece. Screw away. Then repeat. If you are like me and get a few gaps, it is OK because tar paper and shingles will cover it. The last pieces and biggest pieces I had to climb up on the roof to do so make sure to wear shoes with good tread.

Next post I will get to tar paper and shingles which in my opinion is easier but the plywood took a bit to do so I figured I would cover that first.
Enjoying myself on the roof. Wear sunscreen! Luckily I have plenty of big trees to shade me.

Wednesday, May 18, 2016

Welcome

Now that I bought a fixer-upper house in the beautiful city of Crestline, CA at 4500 feet elevation in the San Bernardino Mountains, I am finding there are a lot of projects that I need to do that other people may be interested in but not necessarily know where to start. I've found that a lot of things I never did before and was frankly scared to do are things that are actually easy and are skills that are good to have for any mountain modern woman.

I am going to be writing about not only crafting but actual construction because I've found myself doing both. I love to re-use, re-purpose and use cheap tricks to make things beautiful. I decided to name this blog Mountain Modern Woman because I believe the modern woman should be able to live on her own even if she isn't and I am in the mountains where nature is abundant and should be put to use.